Friday 9 November 2012

Zombie it up!

I FINALLY made a video tutorial!


Here's a few pics:


This year for Halloween I decided to skip all the skimpy outfits and go for the gore. I mean  what other time of year do you get to cover yourself in blood and look utterly disgusting while people compliment you about it?


Monday 5 March 2012

Inspire Me: Tim Burton

Tim Burton's take on stories has always fascinated me. The twisted beauty that he creates is just breathtaking and always makes one think of a different perspective. I pulled inspiration from this for the look I did tonight. Hope you enjoy!


I think it looks very Edward Scissorhands.

Believe it or not I used a bright neon pink cream shadow for the base on my eyes. Transforming a color through adding and serious blending is a great to add versatility to your skills and makes fewer colors go a very long way. Try using a yellow with a brown, or like I did a bright pink with a black to create multi-dimensional colors that give great effects on camera. 

Also remember that when doing makeup with the intention of taking pictures, alot of it gets drowned out by the flash. In the pictures above, I used flash with only one of them, to really show more of the color. But the contouring and most of the color can be seen because I used a ton of it. Exaggerating the contouring makes it come to life, otherwise it just doesn't show up on camera! 

Sunday 26 February 2012

Alice in Wonderland: Red Queen

Alice in Wonderland is definitely my favorite story, I love both books and all the movies made based on them. On top of that I just adore Tim Burton and his many worlds. The looks from his movie are some that I have been wanting to recreate forever and I just randomly decided to start tonight. I was going to begin with Alice, but then had a change of course after I had started and went with the Red Queen.  I hope you enjoy the end product as much as I enjoyed the process of creating it!

I started off with a full lip, with lotsa shine. But then changed my mind and went for the more classic heart shape. I had to use a base for the blue, otherwise it would have never shown up so well! I used a face paint of the exact same shade. Facepaints really come in handy, they make the best bases for colors that need that extra boost to really show. The trick is to invest in good quality ones. There are plenty of beginners kits that include 8-24 colors that are perfect for MUA's. I have a full professional paint kit, it's how I started getting into creative makeup!


Monday 6 February 2012

New Adventures: Belly Painting

I had the privilege to paint my very first belly paintings on my sister-in-law for my first nephew. It's an amazing experience as an artist and  as a future aunt. There is a massive difference between this type of body art and makeup or face painting. It's seriously magical and just plain fun and relaxing.

I'll let the pictures speak for themselves.


Wednesday 11 January 2012

We are all bird-like creatures...

Winter usually has most of us automatically reaching for darker, more neutral colors. I have definitely been a repeat offender of this these past few weeks! So to shake things up I decided to do a dramatic color blocking look with brightness galore!


This was definitely a fun one! Got me out of my winter funk :)

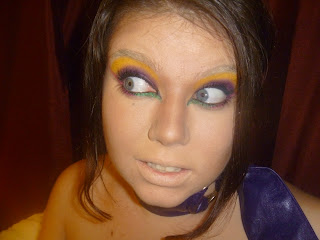
I used 4 colors, Purple on the lid with yellow on top, gently blended to transition one into the other, meaning that all I did was gently pull the yellow into the purple to create a transition area so that the lines wouldn't be so harsh.On the bottom, I used aqua creams from MUFE in green and pink to line and shape my eye, creating a massive pink wing at the outer corners. To finish it off, black liner on my waterlines, liquid liner on top and a generous coat of mascara! 

For my face, I paled out my face to a color about 2 shades lighter than my own (liquid foundation, cream concealer and translucent powder). I also blank-ed out my lips and eyebrows using concealer to really put the emphasis on my eyes. Lastly, I contoured tons with a matte brown contouring powder.

The basic of color blocking rules are pretty simple. Using a color wheel, you fond colors that oppose each other. This means that they are contrasting colors and will complement each other best. The color will pop more next to each other than they would with even a neutral like black.

Color Wheel
This is a technique that you can use when choosing your everyday shadows. Just find your eye color on the wheel and choose an opposing color to rely make them pop. Brown is actually a shade of orange, so that's the one you would reference if you have brown eyes.

Sometimes, I like to have a little fun :P Always such serious pictures get  boring!